Podcasting
Podcasting is another term that you're probably sick of hearing of, even though it's only been around for five years or so. Just like Apple's iMac appearance in 1998 led to thousands of products being called iSomething, Apple's iPod product name has been applied to a vast range of audio and video files that don't actually require an iPod to work.
A podcast is just a broadcast of music or spoken word (and sometimes video) that can be accessed at any time and played back on your computer or portable music player (iPod, Zune, Zen etc.). The extra feature that takes this concept from Web 1.0 to Web 2.0 is the ability to subscribe to podcasts, and automatically download new episodes as they become available. Very similar to our RSS feeds from a few weeks ago.
Just like the RSS feeds, the range and quality of podcasts is vast and ever-changing. Some podcasts are updated daily, some weekly, and some once every six months. Many are very short, like KEXP's Song of the Day, while others can stretch to hours in length, like The Economist's word for word recording of all articles in each week's issue of the magazine. Some are a variation on an existing web site or publication, while others exist as podcasts and little else. A prime example of this later trend is CBC Radio 3, which can only be listened to via podcasts, streaming audio from their website, or satellite radio. Say goodbye to AM and FM.
And of course, in the spirit of Web 2.0, it doesn't take a huge amount of time or equipment to become a podcaster yourself, and let the world hear your voice.
To manage all these podcasts, you need some software assistance. The reigning champ is iTunes, which not only organizes your thousands of MP3 files, but will also subscribe to, update, and synchronize your RSS feeds with you iPod. We're going to keep things simple, and continue to use our Bloglines accounts.
Please do the following:
1. Go to Bloglines and log in to the account you created for the assignment in Week 3.
2. Open a new browser window, and go to Podcast Alley which is a large directory of podcasts.
3. Browse the site using the drop down "Pick a Podcast Genre" menu in the upper left and locate a subject and podcast that interest you.
4. Click on the title of the podcast to get more information, and then click on the Subscribe link. Highlight and copy the address that appears in the box below "Podcast Feed For:"
5. Go back to your open Bloglines window and under the Feeds tab, click Add. Paste the copied address from Podcast Alley and click on Subscribe.
6. Tick the box at the top of the next screen under Available Feeds (if it isn't ticked already) and then click on Subscribe again.
7. Your newly subscribed podcasts will be listed in Bloglines along with your existng RSS feeds. To listen to a podcast, click on it and the window on the right will display all the current episodes. Click on the blue play button of an episode to listen, and adjust the volume on your PC as needed.
8. Add two more podcasts to your Bloglines account, either by using Podcast Alley or by subscribing directly from other websites that interest you. Make a new post to your 23 Things blog, listing your new subscriptions and describing your experiences.
Please send an e-mail to 23things@torontopubliclibrary.ca when you've completed the assignment.
See you next week.
Tuesday, May 25, 2010
Tuesday, May 18, 2010
Week 6: Online Office Tools
So far we've played with a number of tools that change a specialized or difficult task into one that can be simply done by anyone. For example, Big Huge Labs allowed us to take a photo of our favorite cat and turn it into a Warhol-style poster or multi-page calendar with just a few clicks. We didn't need to own or know how to use desktop publishing or photo editing software; instead, the website is the software.
In a similar way, this week we're going to use Web 2.0 tools that eliminate the need for word processing, spreadsheet, and presentation software. Your work can be saved remotely and shared with whoever you like, skipping the hassles and risks of e-mail attachments. Imagine students collaborating on a school presentation from different locations. Or being able to access a full featured word processor and your files (with spell check) from any computer in the world. Microsoft must be a little bit worried.
To start, watch this short video about Google Docs:
Pretty neat? Now let's try it ourselves.
Although we all should have Google accounts, thanks to having Blogger accounts, for some reason the confirmation e-mails never make through GroupWise. Blogger doesn't seem to care if the confirmation e-mails are successful, but Google Docs does. To get around this, we need to take a slight detour an create new Gmail (Google e-mail) accounts.
This may be slightly confusing as we already have Google accounts; just remember that your blog account log in will not be the same as your new Gmail and Google Docs account log in.
Go to mail.google.com and click on the Sign up for Google Mail link and work through the registration process, creating a new Gmail address for yourself. Once that's done, please do the following:
1. Go to docs.google.com, log in using your new Gmail address, and under the New menu, select "Document".
2. A new window will open that looks just like a new document in Word. Type a few lines, try out some different font sizes and colours.
3. Click on the share tab in the upper right corner, and in the next window enter tpl23things@gmail.com as a collaborator. I'll receive the invite to work on your document, and then I'll come and add a few lines.
4. I'll then invite you to collaborate on a document shared by all 23 Things members. Be sure to check your Gmail account periodically for the invite.
5. Try out some of the other features in Google Docs and make a post to your blog with your impressions. Is this a tool that you would use? Do you see it being popular? Any ideas for applying it to TPL work?
6. Send an e-mail to 23things@torontopubliclibrary.ca when you've posted to your blog.
See you next week.
Tuesday, May 11, 2010
Week 5: Tagging and Social Bookmarking
Believe it or not, we are half way through this Web 2.0 training course.
When people try to explain what Web 2.0 is about, they often use the description "social" and we've seen little bits of this in the course so far. However, today we're really going to focus on a tool for being social (and organized) on the web, called Delicious.
Delicious (or as it is sometimes written, del.icio.us) is at its core, a bookmarking tool. It allows you to bookmark web pages, articles, blogs, etc. that you find interesting, fun, or useful, the same as you can using your Favorites in Internet Explorer or Bookmarks in Firefox. However, just like our Bloglines accounts gather everything in one spot, so to does del.icio.us, so you can access your account and bookmarks from any computer.
But this is only the tip of the del.icio.us iceberg. What makes it social is the tagging function, which allows you to classify your bookmarks using keywords, and then share these tags and bookmarks with other del.icio.us users. For example, if you find a great article on increasing public library use by teens through subliminal advertising, you would bookmark it using del.icio.us, and give it a few explanatory tags (teens, library, subliminal, advertising). Then other people using del.icio.us who do a search for any of your tags would find your linked article, as well as other related tags.
The social aspect continues as del.icio.us not only shows the related tags, but also how many other del.icio.us users bookmarked the same article. The higher the number, the more likely the article is a good one (or at least widely read). Try to think of del.icio.us as a peer-reviewed search engine: it won't be as vast as Google, but the bookmarks are screened and recommended by real users.
Please do the following:
1. Go to del.icio.us, click on the Join Now link, and create an account, which requires creating a Yahoo! account as well.
2. The next screen will ask to Add Bookmarking Buttons, but the TPL computers won't permit the software to run. Instead, choose "Skip this step" on the next two screens until you get to the Registration Complete! message. Now, to manually install the buttons go to this link and scroll down to the section called Internet Explorer (Manual)or Firefox depending on your browser of choice. Follow the steps there, and you're done. Note: For Steps 2 and 3, right click with your mouse directly on the blue text in Steps 2 and 3.
3. To see your new del.icio.us favorites, do a right click in the Links button on the far right of your Interne Explorer browser window past the address bar and Go button. Uncheck "Lock the Toolbars" and then click and drag the Links button to just below the address bar. You should now see a number of links for Footprints Work Orders, TPL Homepage, and My Delicious and Bookmark on Delicious.
4. Go and find a web page on any subject you like from any website (perhaps something already in your Internet Explorer Favorites menu). Click on the "Bookmark on Delicious" button in your Links menu.
5. You'll be taken to a new del.icio.us window which shows the URL and title of the page you were on, as well as notes and tags fields. Add a few terms to describe the page in the tags field and click save. You'll then be taken back to the page you were on.
6. Click on the "My Delicious" button in your Links menu, and you'll be taken to your account page where the page you just tagged will be listed, showing how many other people saved the same source. Click on any of the tag key words and a page will open showing all the bookmarks you saved using that tag (only one at this point). If you click on "view all" just above your bookmark, you'll see all the bookmarks in del.icio.us using the same tag.
7. Add two or more web pages to your account by repeating steps 4-6.
8. Explore other tags and do some searches within del.icio.us for topics that interest you. Create a new post to your blog about your experience using this tool, and send a message to 23things@torontopubliclibrary.ca when you are finished.
Although it can be a bit daunting to get set up, once you play around with del.icio.us I think you'll find it has real value.
See you next week.
Tuesday, May 4, 2010
Week Four: Time for Some Fun
Since everyone has been working so hard on the previous assignments, the tasks this week are quick, easy, and fun.
Image Makeover
First, let's make more use of our photo skills. A few years ago you needed specialised software to alter photos and design things like CD covers, calendars, and trading cards. Now, thanks to the "anyone can do it" movement of Web 2.0, there are many tools to help you along. For example, the site Big Huge Labs can take this picture of Melvil Dewey:
The second task is to play around with a tool called a generator. If you've ever been creatively stumped and suffering from writer's (or worker's) block, then a generator might get you going. A generator will take keywords or other information from you and then create a customized result based on what you input.
For example, the Blues Name Generator will take your name and create a bluesy nickname: mine is "Bleeding" Joe Freeman. Other fun tools are a complaint letter generator, a Danielle Steel title generator, an idea generator, and a sudoku generator.
The biggest resource for generators is the Generator Blog. Try out some of the links along the right hand side. Make a post to your blog with any interesting discoveries.
Please send an e-mail to 23things@torontopubliclibrary.ca with the address of your blog when you have finished the tasks.
That's it for this week - have fun!
Image Makeover
First, let's make more use of our photo skills. A few years ago you needed specialised software to alter photos and design things like CD covers, calendars, and trading cards. Now, thanks to the "anyone can do it" movement of Web 2.0, there are many tools to help you along. For example, the site Big Huge Labs can take this picture of Melvil Dewey:

And turn it into this: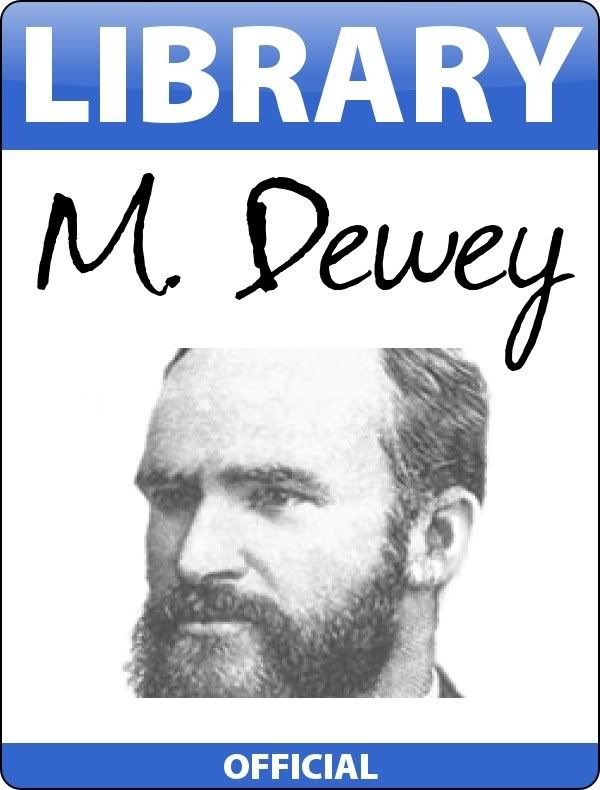
Or this:
Try these out (or some of the other tools from Big Huge Labs) using a picture of your choice.
Start by saving a photo to your Flickr account or 23 things folder on your G: drive. Then follow the steps from Big Huge Labs and be sure to save a copy of your new creation to your G: drive.
Finally, make a new post in your blog and show off your work.
The second task is to play around with a tool called a generator. If you've ever been creatively stumped and suffering from writer's (or worker's) block, then a generator might get you going. A generator will take keywords or other information from you and then create a customized result based on what you input.
For example, the Blues Name Generator will take your name and create a bluesy nickname: mine is "Bleeding" Joe Freeman. Other fun tools are a complaint letter generator, a Danielle Steel title generator, an idea generator, and a sudoku generator.
The biggest resource for generators is the Generator Blog. Try out some of the links along the right hand side. Make a post to your blog with any interesting discoveries.
Please send an e-mail to 23things@torontopubliclibrary.ca with the address of your blog when you have finished the tasks.
That's it for this week - have fun!
Subscribe to:
Posts (Atom)